

Before I begin, I’d like to tell you about the circumstances that led to the creation of this article. So I had this website that I designed with PHP and MYSQL, a nice fully functional and responsive website that I’m very proud of because it was my first fully php designed website, but I had no idea on how I was going to deploy it.

Yes, you read that correctly; I had no idea how I was going to deploy the website because, up until that point, I had only developed websites in HTML and JavaScript, which I had always deployed through GitHub. So I went online, did some research, and was able to successfully deploy my project.

So, if you’re having the same problems as I did, or if you’re just looking for how to deploy your PHP project, you’ve come to the right place because I’ll walk you through how I deployed my PHP website to Heroku.

Create a Heroku account
Open your browser, go to Heroku site and sign up to Heroku here
Open up your project folder in VS code
I used Visual Studio Code as my editor. Open VS Code, navigate to File, and then select Open New Folder. When the file explorer appears, navigate to the local disk, click on xammp, then htdoc, and create your project folder. If your project folder already exists, simply click on it. The files should be saved in /c/xammp/htdocs/project-name, but you can put them anywhere you want.
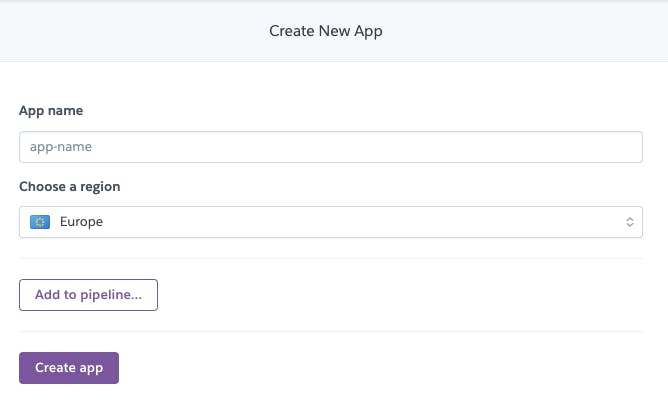
Create a new application on Heroku
Login to your Heroku dashboard and create a new application by clicking on the “create new app”

Choose an app name that is available and then click the “create app” button.
Download the Heroku CLI tools
Go ahead and download the Heroku CLI tools to allow you write Heroku commands from your command line. Click here to download.
Login into Heroku from the terminal
Open VSCode terminal and type in the command “Heroku login”, press any key to open up a page in browser where you can login.


Create a git repository, add your files and commit
You need to git for this round so if you don’t have, go ahead and download one here.
Still in your terminal, issue these commands:
a. git init

b. git add .

c. git commit -m “add all my files”

Push the app to Heroku
Here, we add Heroku as the git repository. Using the command tell git the remote Heroku repository we want to push.
heroku git:remote -a project-name
By using command git push heroku master, deploy to heroku

The URL to your app will now be provided by Heroku. The correct website is the one ending with .herokuapp.com
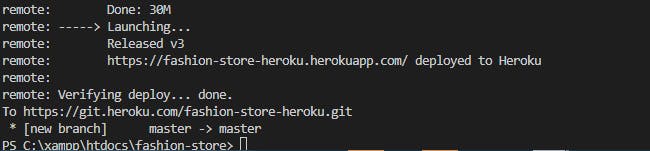
and there you have it y’all, your website is successfully deployed.🎉
Thank you for spending the time to read this. I hope this story is useful to someone out there.
If you like my work, please follow me because I will be sharing a lot of my discoveries in this technological journey. Feel free to connect with me on LinkedIn.