A Beginners Guide to Contributing to a GitHub Open Soruce Project with GitHub Desktop

If you are wondering about how to contribute to open source as a beginner, don’t worry. In this article, we're going to talk about contributing to GitHub projects using GitHub Desktop. There are also various ways you can contribute to open-source projects although most developers prefer to contribute to GitHub projects using the commands in the terminal, which we'll discuss in part 2 of this article. I contributed to an open-source project for the first time using GitHub Desktop, and I'm going to walk you through step by step how to do the same.
Note: Contributing to open-source projects does not necessarily mean that you have to know how to code. Yes, having coding skills is an additional benefit undoubtedly, but that is no criterion for contributing to open source projects.
Let's get started!
What exactly is GitHub desktop?
GitHub Desktop is an application that lets users interact better with GitHub through a GUI (Graphical User Interface). It removes a lot of technicalities of collaborative development, you don't need to know any git commands to use GitHub desktop because the GitHub desktop GUI makes it simple to use by providing buttons for the most commonly used actions. Resolving conflicts on a GitHub desktop is much easier than on a terminal, especially for contributors unfamiliar with Git commands.
Now that we know what GitHub desktop is, let's move on to how we can contribute to it.
First thing first let's do a quick Github setup! (This step is for those that don't have git and GitHub set up on their desktop)
Install git. Follow the instructions here to install git (if it's not already installed).
Create a free GitHub account or log in to your GitHub account, if you already have one.
Download the GitHub desktop app here
Now we're done with the setup, let's start with the contribution!
Step 1: Fork the repository
This action makes a copy of this project and places it in your account. The fork icon is always at the top right of the repository.

Step 2: Clone the repository
This action makes a local copy of the project and saves it on your machine.
To clone: Open the GitHub desktop app and click on the file and then clone the repository

When you click on clone repository, it brings out the lists of all your repository and forks on GitHub. Select the repository you want to clone '<your-github-username>/repository-name' and click on the clone button.
Now you have a local copy of the project on your machine.
Step 3: Create a new branch
This action is taken to keep your changes separate from the master branch, also known as the main branch so that if something goes wrong, you can simply delete the branch without affecting the main project.
Click on 'current branch'
Then click on 'new'
Give your branch a name
Click 'create new branch'
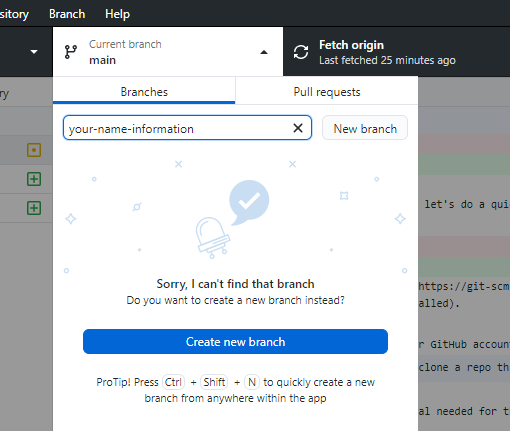
Note: Whatever you do, make sure NOT to work on the main branch.
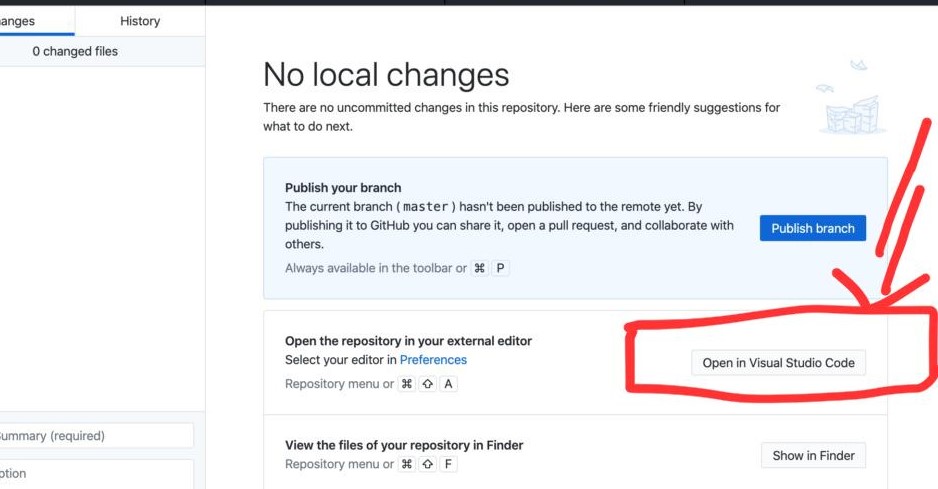
Step 4: Open the project with VS Code (or any editor of choice)
Once you've finished creating a new branch, click the open with Visual Studio code button. The project will open in VS Code, and you can begin editing. If you're using another editor, find the project folder on your computer.
Step 5: Commit your changes
To commit your changes, go back to the GitHub desktop app; you will see that your changes have been added automatically to the staging area which means that all the changes made are already saved. Go ahead and commit by filling in the Summary field (the description is optional). Add a short commit message explaining what you have changed and click the Commit button.
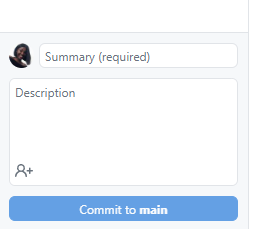
P.S: Commit to the main button in the above image will be committed to the "new-branch name" since you're not working on the main branch.
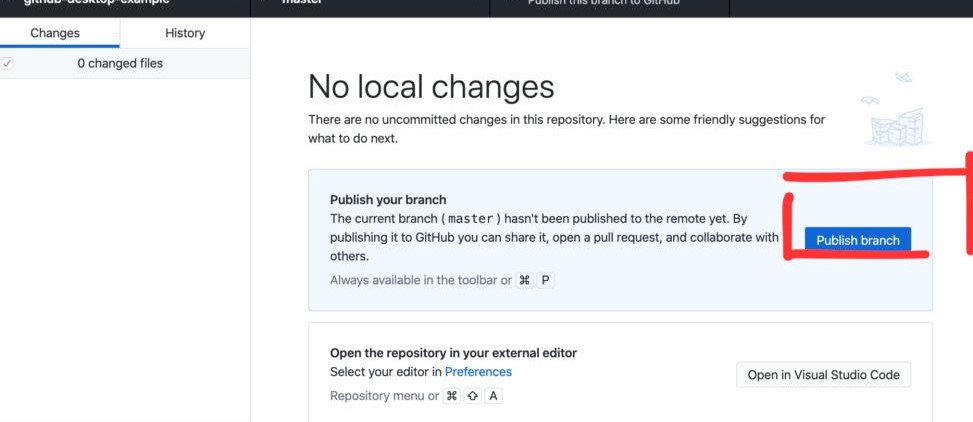
Step 6: Push your changes
Now your changes are committed, the next thing to do is to push your changes by clicking on the "Push" button to get it in synch with your repository on GitHub. You are "pushing" the changes from your local repository to the remote repository on GitHub.
Step 7: Submit a PR(Pull Request)
This is the last stage of your contribution; submitting a Pull Request (PR). The reason for submitting a pull request is so that all the changes you made which are still on your account of GitHub are sent to the main project to be merged. You can submit a pull request, by either clicking on the create pull request button that shows after clicking the push button in GitHub Desktop or you go to the main page of your fork on GitHub, towards the top of the repo you will see a highlighted pull request message with a green button that has Compare and pull request written on it. Click on the button to create your pull request.

Now when the `Open a pull request` page opens, it should look like the one in the photo below. The original project is on the left, followed by the master branch. Your fork is on the right and followed by the branch you created.
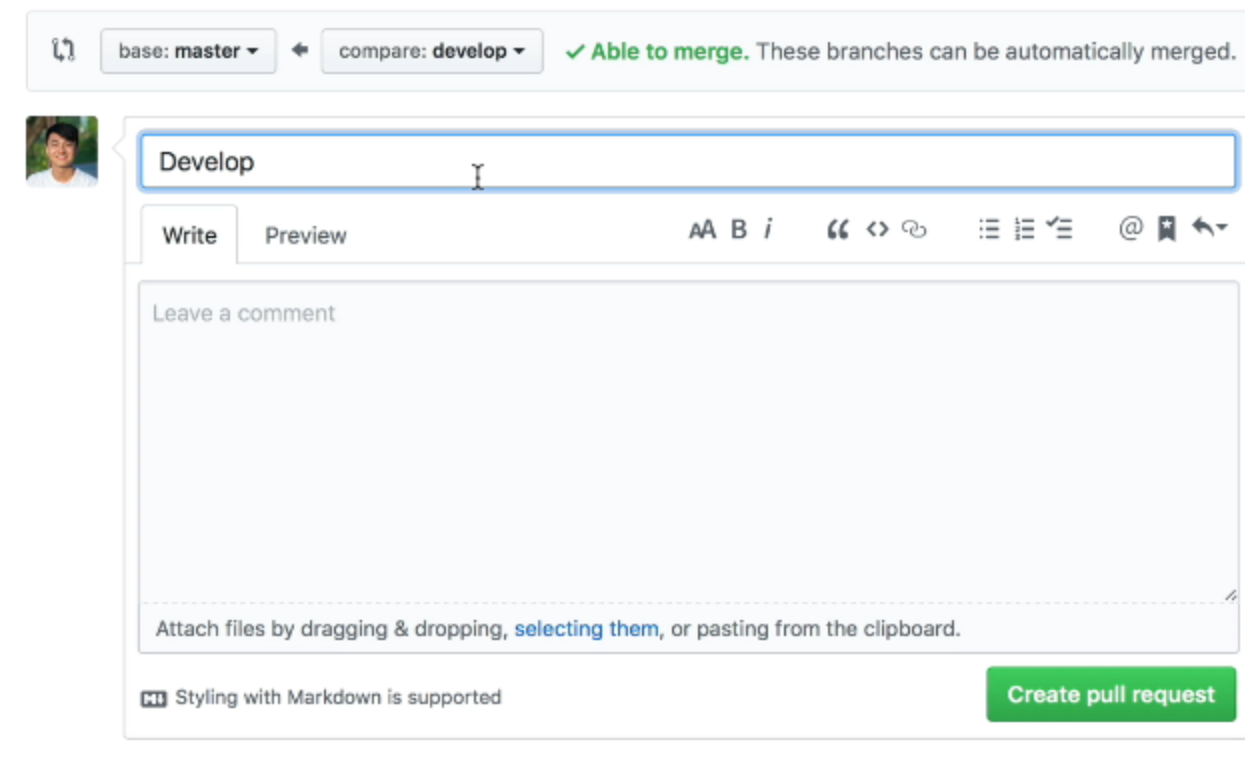
On the pull request page, write a title and add optional information in the description Click the `Create pull request` button.
And that is it, ALL DONE! GUESS WHO JUST CONTRIBUTED TO AN OPEN-SOURCE PROJECT ON GITHUB...YOU!!!👏
I hope that this article provides you with all the help you need and guide you to comfortably contribute to your first open-source project.🤗
Thank you for reading this article, and please stay tuned for my next article, in which we will discuss how to contribute to open-source projects using the terminal.
**Happy Reading!**✨
You can follow me on Twitter


